The Scatter Tool
Program: Vue 6
 Printer Friendly Versions - html format
Introduction
In this tutorial we will be looking at vue 6's scatter tool and how it works. I will be giving examples of what each section of the scatter tool does and how to use it.
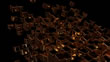
I used this tool in creating my render titled: chromesphere
![]() See my replicate tutorial to learn more about the vue replicate / scatter tool.
See my replicate tutorial to learn more about the vue replicate / scatter tool.
Selecting the amount of copies
The scatter/replicate tool in vue allows you to create multiple copies of one or more objects in your scene. At the top of the scatter/replicate objects dialogue box you have 2 options: use seleceted objects or generate (a number) of copies. The first option is self explantory: only the objects you have selected in your scene are manipulated by the tool. The second will generate copies by the number specified. So for instance if you have 3 squares selected in your scene and you enter 5 in the generate copies field, you will end up with 15 (3 squares x 5 copies).
The scatter objects page vs the replicate objects page
The fundamental difference between these 2 tools, is the scatter page will randomly place objects between the values (or the range) that you have specified where as the replicate page will place your objects in a uniform fashion, like steps in a stair case or wooden planks in a fence for example; they are placed at regular intervals. You can only use one tool at a time.
Using the scatter objects page
So, first you must decide what options you would like to apply to your replicated objects: size, move, rotate, twist. These can be enabled / disabled by the checkboxes above each field.
Move
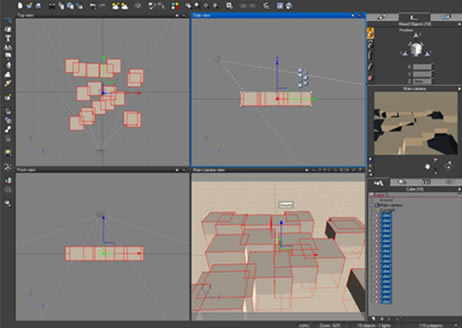
I have created a default scene with a 6m x 6m x 6m cube to demonstrate the effect of using the move option on a single object. If you were to create copies of your object using the default values that appear when you first open the dialogue box using the move option you will get a cloud of cubes.. The values that appear by default for this field seem to be a certain radius around your existing object based on the objects size. Chances are if you are creating randomly scattered objects, then this behaviour will suit your needs. In this example i have entered a zero value for both minimum and maximum position on the z axis. You can see from the below screenshot that the cloud of cubes has been restricted on the Z axis and 'flattened out'.
![]() Note: you do not need to have the original cube placed at x0 y0 z0 co-ordinates. When you specify z min and max values you will force all replicated objects to appear as pictured below.
Note: you do not need to have the original cube placed at x0 y0 z0 co-ordinates. When you specify z min and max values you will force all replicated objects to appear as pictured below.
Scatter: Move Field - Z axis restricted:

Click to Enlarge
Click to Enlarge
![]() Note: An example of how you could use this scenario in one of your scenes might be to create the rings around a planet or group of city buildings. You can also use this in conjunction with rock objects and check the "with variations" checkbox to create a blanket of rocks for your scene.
Note: An example of how you could use this scenario in one of your scenes might be to create the rings around a planet or group of city buildings. You can also use this in conjunction with rock objects and check the "with variations" checkbox to create a blanket of rocks for your scene.
Resize
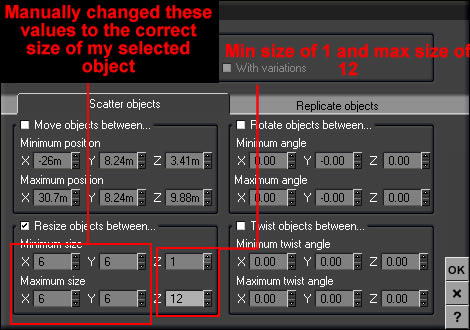
The resize field will create random sizes according to the values you specify for each axies. Using the scene from the example above (6x6x6 cube) I have entered a minimum value of 1 and a maximum value of 6 for the z axis, for this demonstration. As i have deselected the move field, the copies are created on top of each other. I have manually seperated the cubes in this screen shot so that you can see the varying sizes that were created
Sidenote: According to the vue manual when you first open the dialogue box it will display some values based on your selected objects. So for instance if you have a cube of 3m x 3m x 3m, these 3 values should be displayed in the 'sizes' field. In my experience i have not found this to be the case. The cube that im using in this example is the 6x6x6 cube that we used above, however for the default values, 3x3x3 appear. Infact for some reason the values that appear are always half of the smallest object you have select.
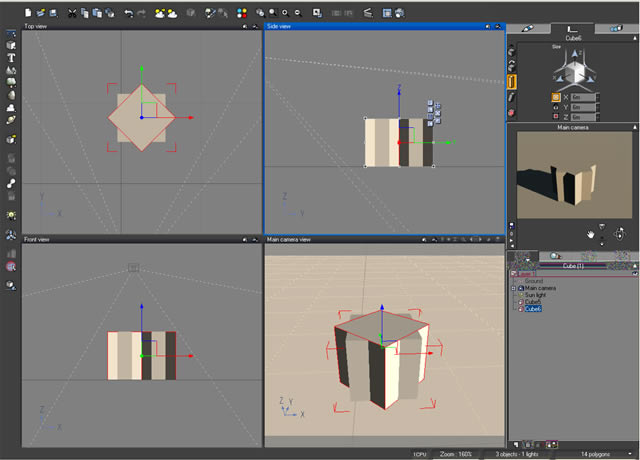
Scatter: Size Field - Z axis restricted:
Click to Enlarge

Click to Enlarge
As you can see from the screen shot above 3 new copies of the original cube are created except with a random size between 1 and 6 and the z axis. The orginal cube is also manipulated in the process.
Rotate and Twist
The rotate and twist fields values are measured in degrees. The princple of how these 2 fields work is essentially the same as the move and size fields: On each axis you enter the range you want your randomly generated objects to be constrained to. For the following 2 examples I have created 2 identical cubes, selected only one of the cubes, and using the "use selected objects" option at the top of the scatter/replicate screen, i have entered a minimum and maximum value of 45 (degrees) for the z axis. From this you can see where 0 degrees and 45 degrees lies. If you were to create 10 duplicates and enter 0 min and 45 max for rotate, all 10 objects would be placed in a randomly rotated/twisted position between these 2 points:
Scatter: Rotate Example (45 Degrees Z Axis)
Click to Enlarge
Scatter: Twist Example (45 Degrees Z Axis)
Click to Enlarge
In my next tutorial we will be looking into the replicate tool and making an object array to use as a simple staircase and a spiral staircase.
This concludes the scatter tool tutorial
Chromesphere
