Creating Area Lights in Vue - Part 2
Printer Friendly Versions - html or pdf format.
Candles, Area lights, and Translucent Materials
In this tutorial we will be expanding on what we have learned in the previous area light tutorial, by creating a photo-realistic candle scene with a flame and applying an area light to the flame. I will also touch on translucent materials. I will not be going into as much detail for the basic steps like moving objects and scaling etc as these have already been covered in previous tutorials.
![]() See my previous Area Ligt Tutorial to learn some of the basics
See my previous Area Ligt Tutorial to learn some of the basics
To begin with, download this candle object model I have created in 3D strata. Import this objectj file into a new vue scene. Resize the model to something around 20-50cm's in height, and zoom the camera in on the candle.
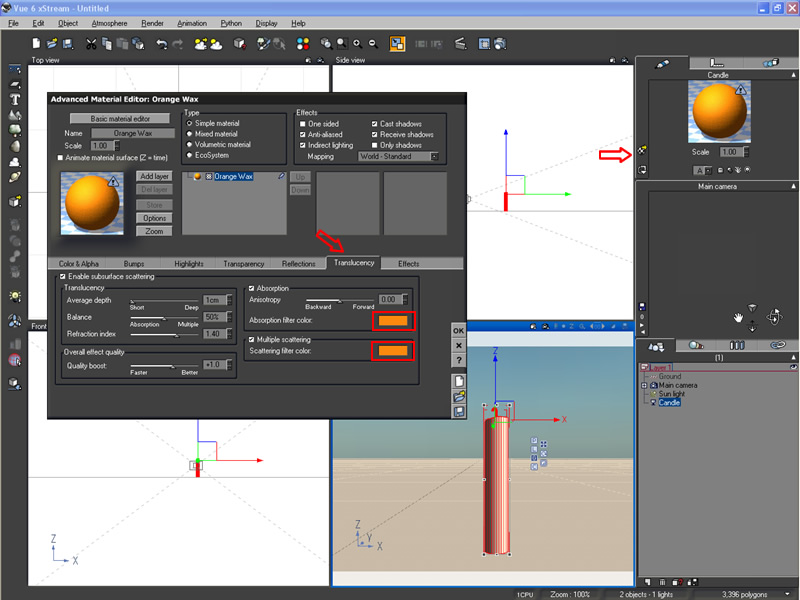
Next we will be applying a texture to our candle model. We have a couple of options here. We can apply a simple "flat white" texture (found in the "basics" folder of the Vue materials library) or add the translucent material "orange wax" (found in the "subsurface scattering" folder of the vue material library). The later option will look more realistic. The candle won't look flat and will absorb the light from the flame but please keep in mind that using translucent materials will significantly increase render times. If you have decided to use the "orange wax" material, your probably going to want to change the color from orange to something else. To do this edit the orange wax material in the material editor and under "Translucency" change absorption filter color and scattering filter color to a color that you want your candles to appear as. For my final render i used a very light yellow color.
Click to enlarge
Creating the flame: To begin, create a sphere. Stretch the sphere upwards to create an oval shape. This is your flame object. Resize this object so that it is within proportions to your candle i.e. looks like a flame. Position it so that it is at the top and centered with your candle object. Apply the "Flat White" basic material to the flame object..
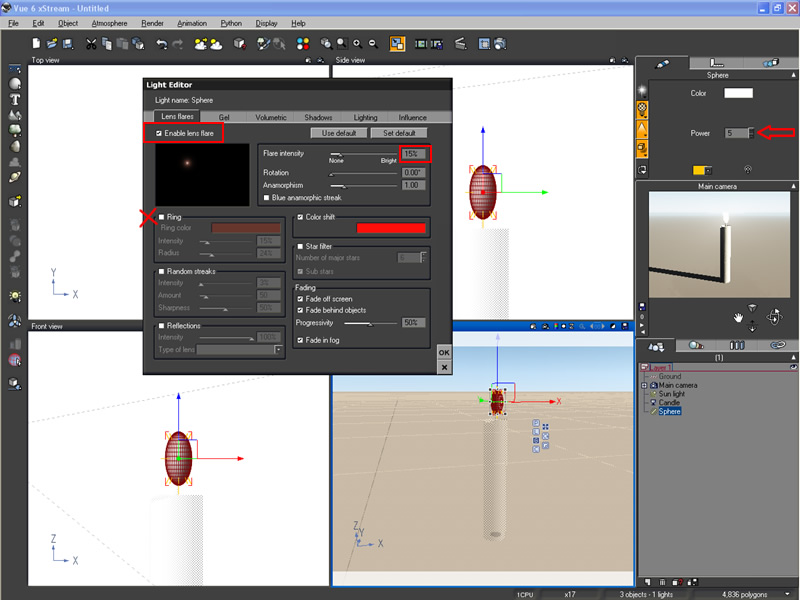
Next we need to convert it to an area light ((File menu -> Object --> Convert to Area Light ) and lower its power setting. Candles are not like light bulbs or sunshine or even lamps, they emit very little light, so in order to keep our scene looking realistic, its a good idea to keep the power very low. For this tutorial I set my flames light power to a value of 5.
Go into the light editor and enable flare. Reduce the size of your flare to approximately 15% and turn the "ring" option off.
Click to enlarge
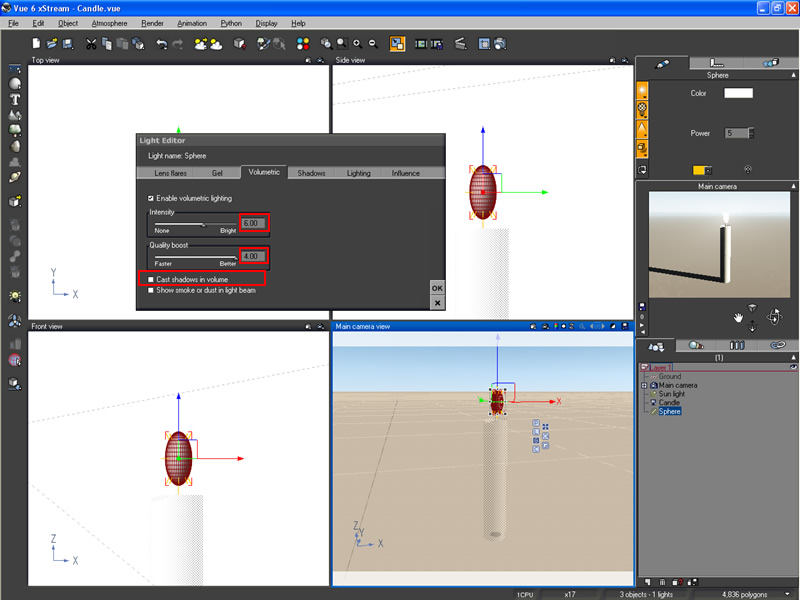
Still in the light editor turn Volumetric on and increase intensity to a value of 6. Also increase quality to full and uncheck the "cast shadows in volume" option. This will make your light look smother and will help avoid any graininess caused by volumetric light.
![]() Note: If you are creating multiple candles in a scene, turn volumetric light on for only one candle and turn it off for the rest. This will help reduce your render time.
Note: If you are creating multiple candles in a scene, turn volumetric light on for only one candle and turn it off for the rest. This will help reduce your render time.
When you are working with radiosity scenes its also a good idea to create an enclosed environment. Light sources that are enclosed will bounce their light from all directions / off all surrounding walls, making for a more realistically lit environment. The quickest way to do this is to first create a cube 60m x 60m x 60m or whatever size you require for you scene. Position the cube so that it is level with the ground plan and so that it encompasses all of your scene objects, including the camera you are working with. When the cube is in the right spot press control-D to duplicate this object. Scale down one of the cubes so that it is smaller on all axis then the other cube. For the above scenario I would enter 59m x 59m x 59m. Boolean Difference the smaller cube from the larger one to hollow out the inside of the cube. If you are unfamiliar with Boolean operations, check out my previous tutorial on this subject.
![]() Tip: You can save this object into your Vue library and import it whenever you are working with room's and radiosity.
Tip: You can save this object into your Vue library and import it whenever you are working with room's and radiosity.
To finish off the scene we need to adjust our lighting like we did in the previous area light tutorial.
1)
Delete the sun from the scene
2)
In your atmosphere editor, enable radiosity in the light settings,
3)
increase radiosity gain to 1.5 and
4)
slide the light balance setting all the way across to 100% (sunlight).
Its also worth noting, when your render is complete, if you enable "lens glare" in the post processing options, the edges of your candle flame's will become softer.. You can see the difference in the following 2 examples. You may need to enlarge these pictures to see the detail as the effect is a VERY subtle one.
![]() Note: If you are having trouble seeing the difference, try downloading both enlarged pictures to your computer and flicking instantly from one picture to the other. The difference will appear much more obvious.
Note: If you are having trouble seeing the difference, try downloading both enlarged pictures to your computer and flicking instantly from one picture to the other. The difference will appear much more obvious.
Candles without post processing "Lens glare" enabled
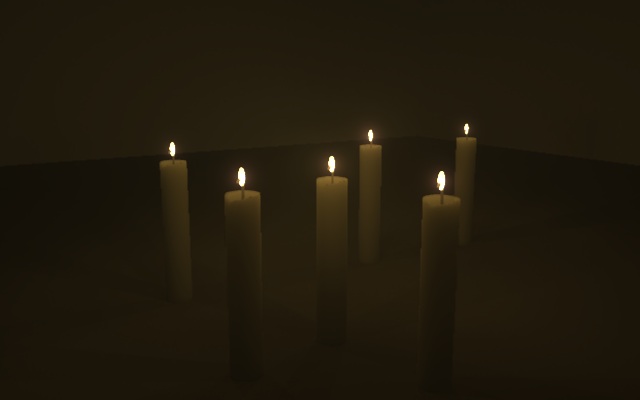
Click to enlarge
Candles with post processing "Lens glare" enabled
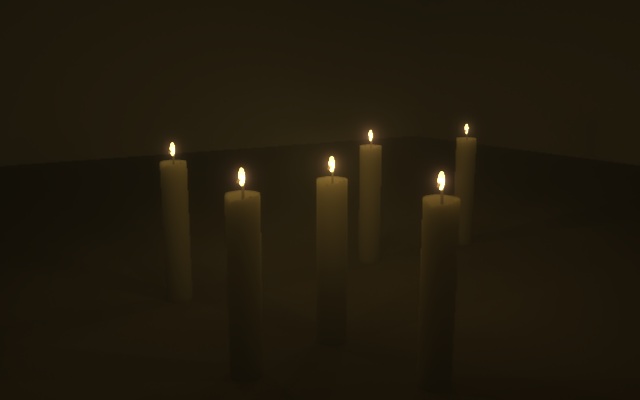
Click to enlarge
Add as many candles to your scene as you like, but keep in mind that for each candle you add, you are adding an extra light source and increasing your render times.
This concludes the area-light tutorial part 2. Thanks for reading!
Chromesphere