Tips and information for Setting up a Rendercow Network
Rendercow & Hypervue Network Rendering Manager
Windows operating systems
In this tutorial I will be going over how to set up a rendercow / hypervue rendering network.
![]() The majority of this tutorial has been written with the assumption that the reader has minimal IT skills. However, its difficult to write a tutorial involving computer networking without getting technical. When giving technical instructions, i will try to explain these step by step.
The majority of this tutorial has been written with the assumption that the reader has minimal IT skills. However, its difficult to write a tutorial involving computer networking without getting technical. When giving technical instructions, i will try to explain these step by step.
Rendercow
You will need to install this small program on all network nodes (pc's) that you wish to use to render your scene. After installation a small RenderCow icon will appear in the pc's tool tray (bottom right of your screen). Right click on this icon to start / stop the service and define a port setting used by this rendercow (if required). Click the 'show' option, to bring up a small status window. This will show you the status of this rendercow (50% rendered, Sending Tile, etc). If this information differs from the status in the Hypervue Manager Screen, the RenderCow may have lost sync with the Hypervue Manager or the network.
RenderCow is included on the Vue installation CD, usually as a separate installer.
Hypervue
Using Hypervue and a number of Rendercows can significantly reduce rendering times and is well worth the effort of setting up.
When you install vue on your machine, 'Hypervue' the program that controls all the rendercows in your farm, is also installed onto this machine. To access the Hypervue interface you must select 'external renderer' from within the 'Rendering Options' screen to get to the Hypervue Network Rendering Manager screen (Figure 1.2).
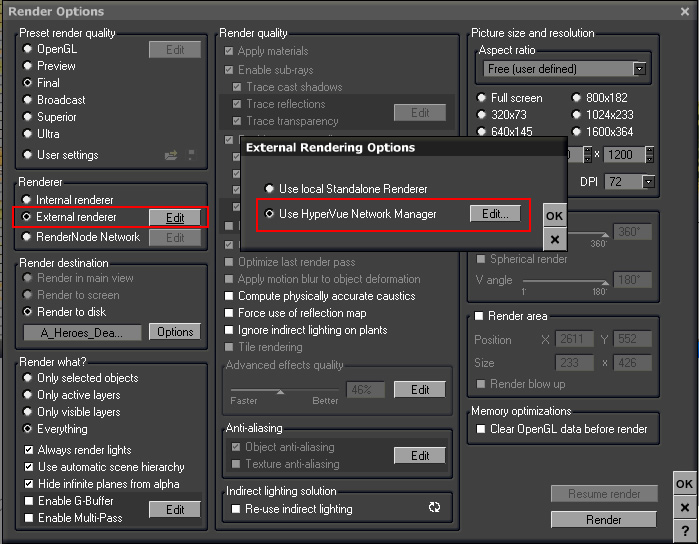
Figure 1.1 - Rendering Options
![]() 'Render Area' renders must be done as a standalone render. If you try to select external renderer in the rendering options screen and the radio button doesn't stay selected and reverts back to the standalone renderer option, uncheck Render Area in the right hand column (see Figure 1.1). Also note Hypervue does not support motion blur. Renders including motion blur must also be done as a standalone render
'Render Area' renders must be done as a standalone render. If you try to select external renderer in the rendering options screen and the radio button doesn't stay selected and reverts back to the standalone renderer option, uncheck Render Area in the right hand column (see Figure 1.1). Also note Hypervue does not support motion blur. Renders including motion blur must also be done as a standalone render
![]() Hypervue can run without Vue being open in the background. It is a completely separate process to the vue modeling program you create your scenes in, so don't be afraid to close the opened scene if your no longer working on it. Hypervue will continue rendering the scene in the background.
Hypervue can run without Vue being open in the background. It is a completely separate process to the vue modeling program you create your scenes in, so don't be afraid to close the opened scene if your no longer working on it. Hypervue will continue rendering the scene in the background.
RenderCow Compatibility
Build Number
The build number for all PC's in your renderfarm should be the same, and can be found on the Hypervue Network Manager Screen. Build numbers of my render farm are shown here highlighted in red. (Nodes have been removed from the list for security reasons). Keep watch of these numbers if you have auto-update enabled on your Vue machine.
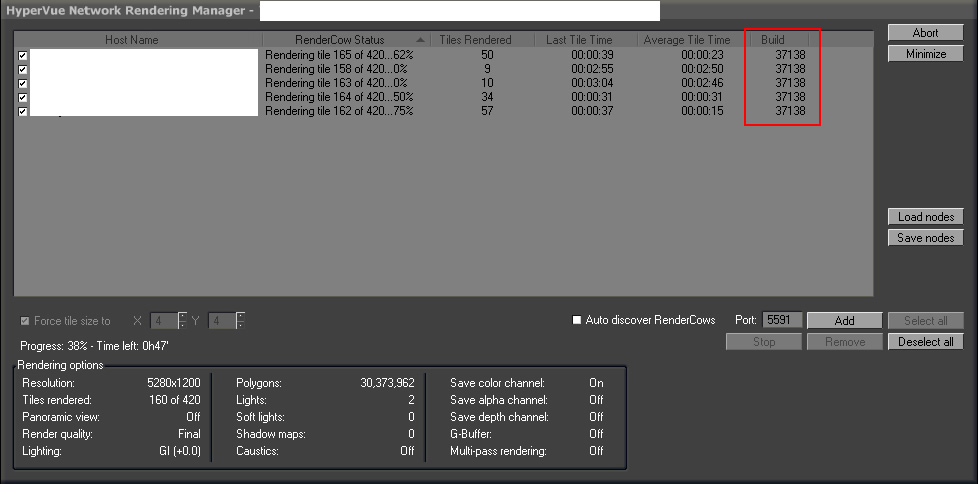
Figure 1.2 - Hypervue Network Manager - RenderCow Build numbers.
Adding a RenderCow to the Hypervue Network Manager
In the Hypervue Network Rendering Manager screen you can add RenderCows, through the 'add' button. The most reliable way I have found to add a RenderCow on a local network (inside your home or office for instance) is to add the RenderCow using an ip address.
Finding an IP address on a RenderCow Machine
To find out the ip address of another computer on your network, go to that machine. Hold down the windows key and press the 'R' key to display the 'Run' dialogue box. Type 'cmd' in the dialogue box and hit enter. A black 'command prompt' box will appear. Type 'ipconfig' in this box and hit enter. Find your active network connection from the information that appears. For instance, if you are using wireless on your computer, it will most likely be 'wireless LAN adapter'. Disregard any adapter that states 'media disconnected'. Look for the line that says ip address.
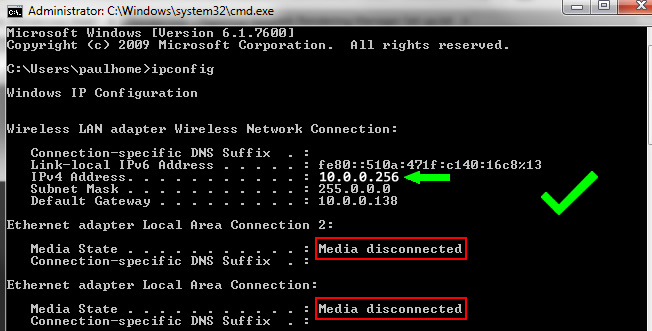
Figure 1.3 - Locating your ip address in command prompt
![]() Your ip address will not be the same as the one in this screen shot. All 4 numbers may differ
Your ip address will not be the same as the one in this screen shot. All 4 numbers may differ
So, the character string you are looking for will be represented by 4 numbers, separated by dots. <number> . <number> . <number> . <number>
This is the pc's 'ip address' and is entered into the Hypervue 'add' screen, for the ip address field, to add the RenderCow node to the list:
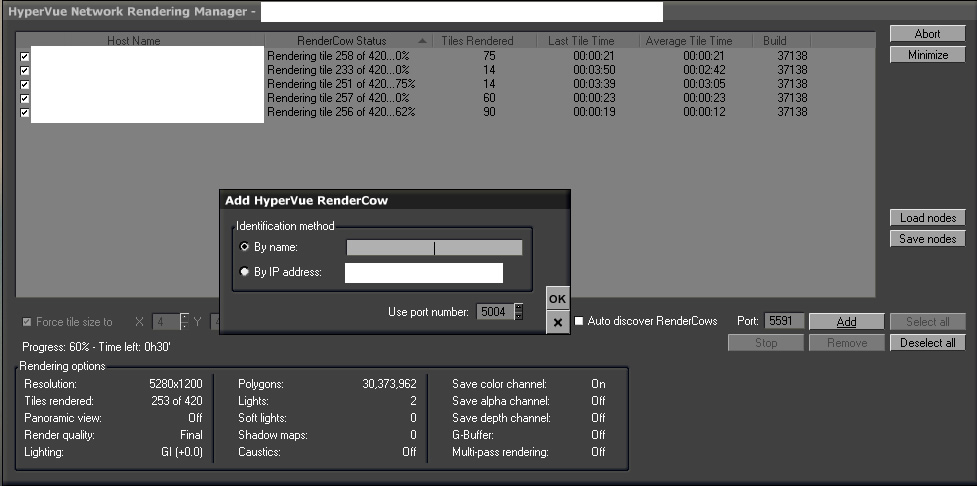
Figure 1.4 - Adding a rendercow via IP address
Adding your vue machine to the Hypervue Network Manager
If you intend to use the machine that has Hypervue on it as a render node, this pc must have rendercow installed on it as well. You can add this machine to the list, by simply typing the name 'localhost' into the name field of the 'add' screen, or by typing in an ip address of 127.0.0.1
Removing a Working RenderCow from the list
The most reliable way I have found to remove a working RenderCow from the list without creating errors in the final render, is to uncheck its name in the list, or click the RenderCow in the list and then click the 'stop' button, both options having the same effect. If you click "Remove" without stopping it first or if you simply switch off the machine mid-way through processing a tile, errors can occur in your final render, half-rendered tiles for instance.
Tiles are not checked for errors at the end of the job. It is this factor that i would encourage you to only install RenderCow on machines that you know will be permanently on (not a laptop that auto-shuts down after 30 min's for instance), or a pc being used by someone how is unaware of the work RenderCow is doing in the background (and switches it off). It is very frustrating spending 24 hours+ rendering a scene, only to have a broken tile ruin the shot.
Tile size
If this option is not checked, the scene is broken up into very large squares. If you have a slow pc in your farm, you may find the force tile size option can help decrease the total time of your render. If this slow pc is still rendering the last tile in the scene and your other pc's are idle, the remaining pc's will begin rendering this tile as well, until one of them finishes the render. I have had mixed results with the force tile size option, both options having pro's and con's.
On a side note, for some reason, if you enter your own tile size in the x and y fields, this does not seem to take effect and the tile size stays at 64 x 64. It doesn't matter what number you put in the x y fields, the number of tiles stays the same.
Computer Specs
What computer system makes a good RenderCow?
CPU speed is by far the most critical factor in determining render power. In my experience I have found, the render power for, say, a quad core 2.6ghz cpu will process almost exactly 4 times that of a single core 2.6ghz. This might sound obvious, but its not uncommon to find inefficiency in other programs when dealing with multi-core processing of tasks. Rendercow works all cpu cores equally to 100% of their capacity.
If you are finding a PC isn't rendering as fast as you expected, go to the pc with rendercow installed and press alt ctrl and del keys together. On the 'task manager' screen that appears, click on the 'processes' tab and sort the list by the 'cpu' column. The list will be ordered in cpu utilization order (ie cpu usage). The column is represented in percentage, so 99 means 99% of the cpu time is being used by whatever process appears in the image name column (rendercows image name is "vue # rendercow.eon" where # represents version number).
Obviously, the rendercow needs a current job before you will see RenderCow working in this column. It will be listed, but the CPU column will read 0%, ie, its not currently doing any work.
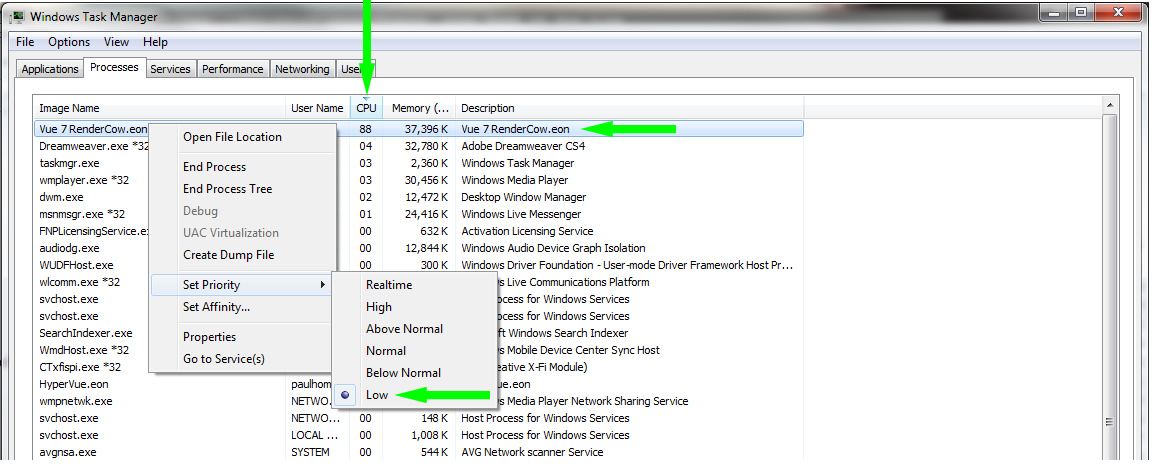
Figure 1.5 - RenderCow properties in Task Manager
If you find the number never goes above 25% or 50%, you may find that the rendercow is only using a single cpu core. This doesn't happen very often, but i have seen it come up a couple of times in the past. Try restarting the pc, or reinstalling rendercow on the pc.
This method of checking cpu utilization is also useful for checking for a suspected crashed RenderCow. In Figure 1.5 you can see an option in the right click menu 'end process'. Clicking this will force RenderCow to exit. I have found that the 'Shut Down' option available by right clicking the RenderCow icon in the tool tray often will not stop a RenderCow from working if it has crashed and the only way to end the process is by ending the task in Task Manager. Reload the Rendercow once it disappears from the process list.
Also note, RenderCow will only use whatever 'idle' cpu power is left on the computer. So if have a lot of other programs running, they will take precedence over RenderCow. Thus an idle computer will process scenes quicker then a busy one. The reason for this is that by default, the RenderCow process is assigned to 'low priority'. I do not recommend changing this priority however, as it can cause system instability. Figure 1.5 shows the task manager screen sorted by CPU Utilization and the 'priority' screen, which can be accessed by right clicking the process name and mousing over 'set priority' in the fly out menu. The green arrows, pointing to all of the areas discussed in this section of the tutorial.
What system specifications are good for a Vue / Hypervue system?
CPU is also the most important factor here, however, I thought it would be a good time to mention this, although ram usage for rendercow is generally quite low (50-100mb max), ram is somewhat more important on the hypervue / vue system. Large scenes can use up ALOT of ram and should have more memory available to them.
Tip for productivity
The maximum amount of rendercows allowed with the vue xstream license is 5. If you have 5 additional machines not including the PC that you create your scenes on, you could remove this 'designing' machine from the Hypervue list, as this machine will no doubt need the cpu power while you are working in Vue. You can continue working while the 5 other machines are processing the last render. Although the RenderCow process is set to low priority, it can have an effect on the performance of a system and will also take longer to process in the background, as the machine will be under heavy use by Vue.
Remote Rendercows (Advanced Networking)
Unfortunately. the ideal RenderCow machine is not always in the same house / office as the Hypervue Machine. A remote rendercow is a rendering node situated on another network over the internet. Hypervue supports remote rendercows. You will need to configure both routers (local and remote) to open the port at both ends. Because Hypervue allows you to specify a specific port at both ends, you can configure more then one remote pc to run rendercow (ie 2 pc's on the same remote network). As shown in this basic diagram (figure 1.6) the 2 remote pc's in the "Home Network" are connected to the Hypervue Manager in the "work network" using 2 different port numbers.
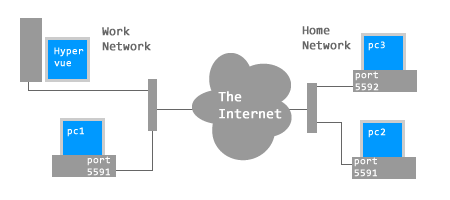
Figure 1.6 - Specify different port numbers for multiple PC's on a remote network
Client Disconnected
If you are continuely receiving the 'disconnected' status message in the HyperVue for a remote RenderCow that you are currently setting up, there is a good chance that there is something wrong with your firewall set up or port settings. When all settings are correct, this message will change to 'idle' or some other status message. A crashed RenderCow can also cause a 'disconnected' status message and is often the case when dealing with local RenderCow's.
Specifying Port Numbers
Open all ports used for the remote RenderCows in your router set up to allow each remote PC to communicate with the Hypervue manager. Specify the different port numbers as you add the remote PC's into the Hypervue Manager. Enter this port number on the add RenderCow screen (figure 1.4 above). The right click menu of the RenderCow tool tray icon is where you specify the ports on the Remote RenderCows. Figure 1.7 Shows the option to change the port number of the RenderCow:
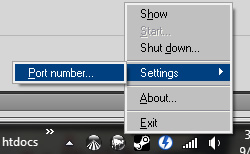
Figure 1.7 - Specify a port number for your Rendercow - Rendercow Right Click Menu
You will also need to add the ports to your software firewall if you have one, on each of the pc's.
Specifying Remote IP or Domain Name
In the 'add' screen you will have to tell Hypervue the (external) IP or Domain Name of a remote RenderCow. If you have more then one remote rendercow on the same network, the domain name / external ip address will be the same, the port number will be what differentiates one from the other.
If your remote networks ip address is dynamic you will have to acquire a (dynamic) domain name, otherwise you will have to re-enter the external IP address whenever your router restarts.
![]() See my Dynamic IP Web hosting Tutorial to learn more about obtaining a domain name for a dynamic IP address.
See my Dynamic IP Web hosting Tutorial to learn more about obtaining a domain name for a dynamic IP address.
How can you tell if your IP address is dynamic?
Do a search in google for 'What's my ip address". Click on one of the proceeding links. Make sure you click on the link to get the correct IP address (the one listed in the results is NOT your ip address). Restart your router (switch it off and on) then do the same search again. if the IP address has changed, you have a dynamic IP address. Rarely, your ISP may hand you the same IP address that you had previously.
This concludes the Hypervue Network Rendering Tutorial