www.chromesphere.net
The Basics of Optics
Getting used to a material editor within a 3d program can be difficult.However, alot of the concepts used in 3D are real world concepts. I found using a material editor become easier once i understood some of the basic ideas of optics as they are in reality. In this tutorial i will be explaining some of these "real-world' concepts and how they relate to 3D.
Refractive Index
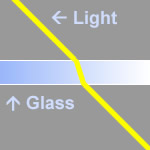
As light passes through a transparent object it warps. Like looking through a drinking glass, the image on the other side will appear distorted. This is known as "Refraction" and the "Refractive Index' is the scale of how much refraction a material will cause on light beams.
All transparent objects have refraction, even air (1.003) even if it is a very small amount. Magnifying glasses and telescopes are examples of how when accurately applied refraction can be used to enlarge an image. Some other examples are:
Vacuum: 1.000 (Zero Refraction)
Air: 1.003
Ice: 1.3050
Water: 1.3330
Glass: 1.52
Emerald: 1.576
Ruby: 1.711
Crystal: 2.000
Diamond: 2.418
Note: In real life, these values can vary slightly depending on factors like impurities in the substance, temperature, etc.
Here are some rendered examples using the above values. Note that the only setting that has changed in these examples is the refractive index.
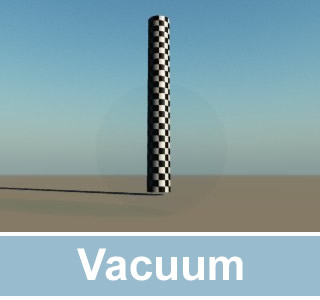
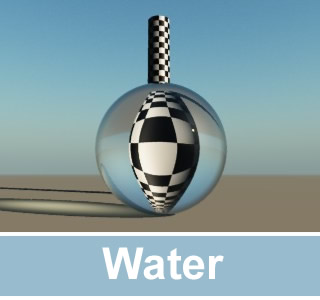
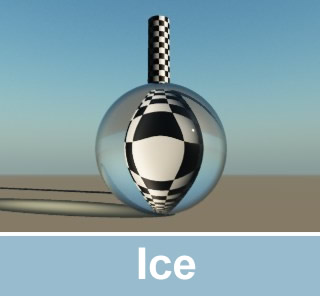
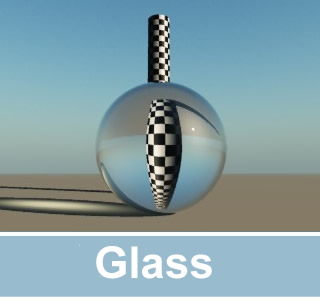
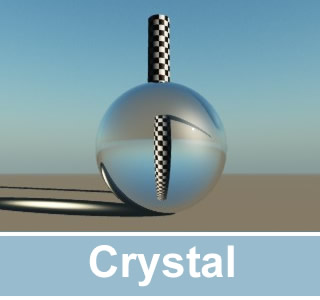
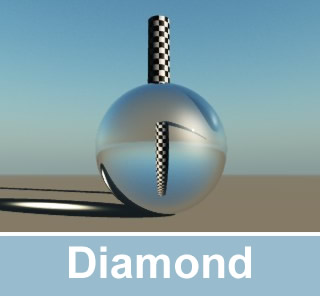
You can simulate any transparent materials refraction using the refractive index, all you need to know is its value.
Diffusion
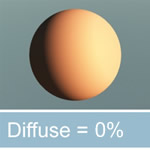
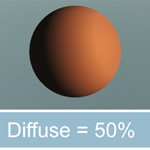
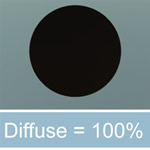
Generally speaking, the word diffusion means to "spread out" or to "not concentrate in one place". A real life example of this is when the sun shines on a 3 dimensional object it creates a sharp, well defined shadow. When the sky is overcast, the light from the sun passes through the sky's cloud cover and the light spreads out. The 3D objects shadow becomes softer in this instance and the scene has less contrast. This is called diffusion and the effect in 3d is the same. As we increase the diffuse the shadows become smother:
Bump Mapping and Displacement
Bump Mapping: Usually controlled through a "bump height" setting, this creates the illusion of a tactile texture (eg, bumpy, jagged, sharp surface etc) but does not effect the outer geometry of the object.
Displacement Mapping: Displacement mapping when applied to a texture will displace the geometry of the texture around the outer edge of the object so that it appears rough. Displacement mapping requires a pre-existing bump-map before it can define edge roughness i.e. you must have bump mapping enabled before you can use displacement mapping. Furthermore, enabling displacement mapping will add an additional overhead to rendering times.
The following examples show the difference between these 2 settings:


Note: All 3 of the above examples use the same perfect sphere shape and the same material. Also, some rendering engines will not show either effect until rendered.
Ambience
When an object has ambience it is "self-illuminating". The object will resist shadows and at the extreme end it will glow in the dark. As an example, in an natural scene with a bright sun, the terrains and plants in this scene would look best to have little to no ambience; their shadows are dark and harsh. Note: we are referring to the shadows that appear around the body of the object here. not the shadows that are cast onto the ground plane.
In the example below, as we increase ambience, the portion of the object that would usually be undefinable due to a dark shadow, becomes lighter and more visible:
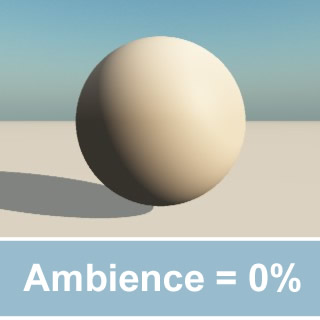
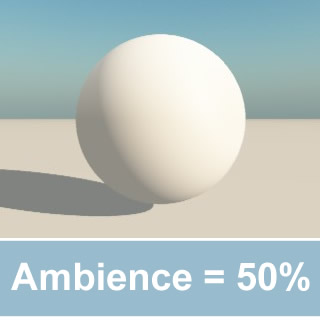
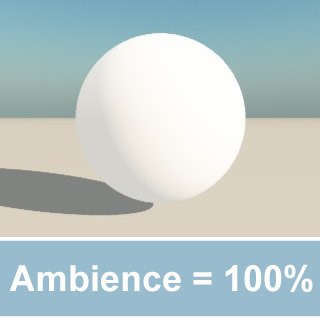
Please note that the above example has an extreme effect because i have used standard raytracing rendering. Ambience will still have a similar effect with other rendering models, like radiosity, global illumination etc, the only difference being the effects will be more subtle.
Tip: in most cases, making ambience consistent in a scene for all objects will create more natural looking lighting. An exception to this rule might be for an object underneath a desk lamp. This object should appear brighter then the rest inside of the room.
Reflection and Specular Highlights
Reflection: The reflectivity of an object is linked to its shininess. For instance the shininess of a metal object will be higher then that of, say, bark from a tree, which has no reflectivity. A mirror will have 100% reflectivity as it reflects back everything infront of it. Here a some examples of materials and their reflectivity settings. Notice how the rock in the foreground becomes clearer as the reflectivity is increased:
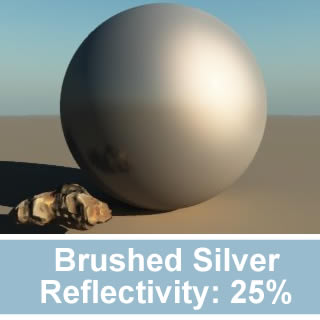
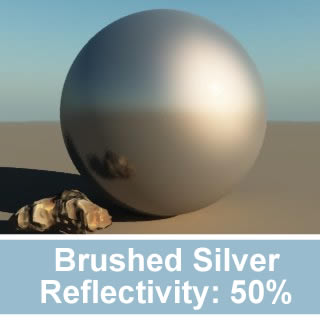
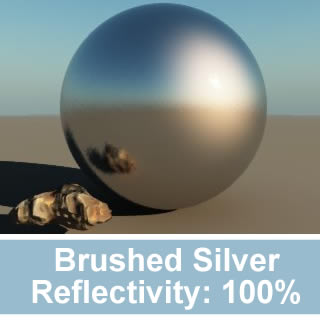
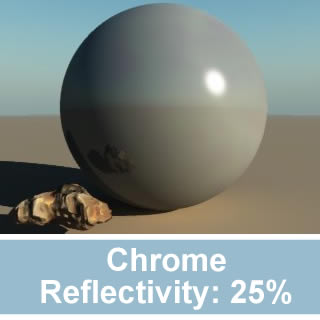
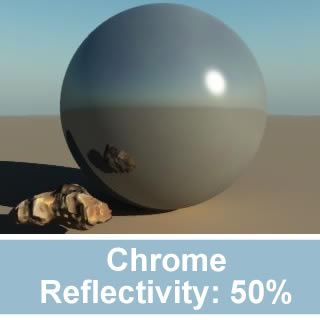
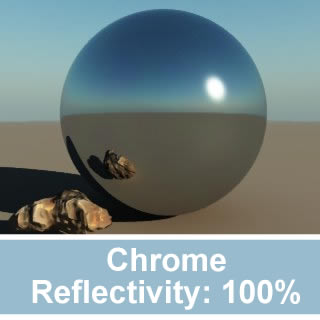
When you are rendering in 3D, the rendering engine "shots" out a raytrace to find out what color each pixel will be according to the scene that you have constructed. If you have an object that is reflective in your scene when the raytrace hits this object it will bounce in the direction of the objects surface. The data it will collect for this pixel will be from the reflective objects surroundings, not from the reflective object itself. In the reflection examples above you can see how the raytrace has bounced off the bottom left corner of the sphere and hit the back of the stone infront of the camera. This whole process can be likened to taking a photo in the mirror. The image of the final shot would show you standing in the mirror holding the camera.
Note: there are also other properties that can be visible in a reflective surface, like a color tint, or a bump map for example.
Going back to our previous example, If the 2nd object was also reflective, it too will bounce the raytrace to yet another object until the process stops. The amount of bounces that a raytrace will make is usually controlled by a setting within the 3D program. In the real world there is no limit, but this must be avoided in 3D as a "hall of mirrors" render would cause a computer to crash as it tries to make an infinite calculation.
Specular Highlights: When light hits a solid, reflective object, it creates a specular highlight. The term specular highlight refers to the bright white hotspot that appears on the object. In my reflection example screenshots above, you can see the hotsoit in the top right corner of the the sphere.
Notice how the "Brushed silver" specular highlight is fuzzy and larger? This creates the illusion of a brushed, rough surface.
This concludes the basics of optics tutorial
Chromesphere